Creating Ringtones Using iTunes in Windows
Its not that difficult to create a ringtone using iTunes on a Mac or PC. Here I’m doing it on a Windows system, but the process is similar on a Mac. Launch iTunes and select the song you want to convert to ringtone. After that, right click on the song and click on Get Info.
Then click the Options Tab. The ringtone can be of maximum 30 seconds so its up to you whether you want to make it 30 secs or shorter. You can select any part of a track, it doesn’t just need to be the beginning, but it does need to be only 30 seconds. Just select the Start and the Stop time and click OK.
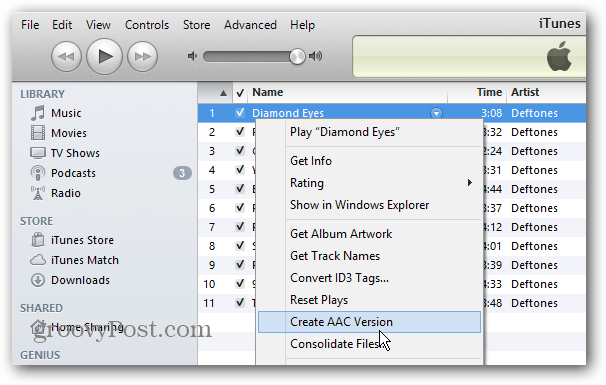
Now right click on the song again and this time click on Create AAC Version.
A copy of the same song will appear in your iTunes library with shorter duration you selected. Right click on it and click Show in Windows Explorer.
It Windows Explorer make sure the file shows extension. If it doesn’t, you can set Windows to show file extension types. Now its time to change the extension of the newly created file. Just rename the file and change its format to .m4r. That’s the type of file your iPhone uses for ringtones. When the message comes up asking if you’re sure you want to change it, click Yes.
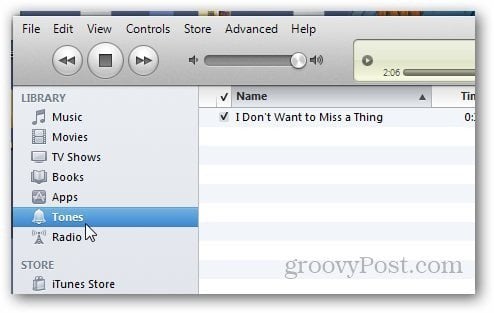
Open iTunes and go to File » Add File to Library.
Browse to the location of the m4r file you created, and select it.
Then you’ll see a Tones folder in your iTunes library. All you have to do now is connect your iPhone to iTunes and sync it with your device by either dragging the file to your device or by clicking on the sync button.
Create a Ringtone Online
If you find the above process to be tedious and time consuming, you might want to use an online tool instead. My favorite is Audiko Ringtone Maker. Just upload the song you want to make a ringtone out of.
Select the time which you want to use as your ringtone and click on Create Ringtone.
It will upload the file and automatically create a ringtone from it. Once created, it will give you the download link to, just use the same step mentioned above to add the file to your iPhone.
Setting Your Custom Ringtone
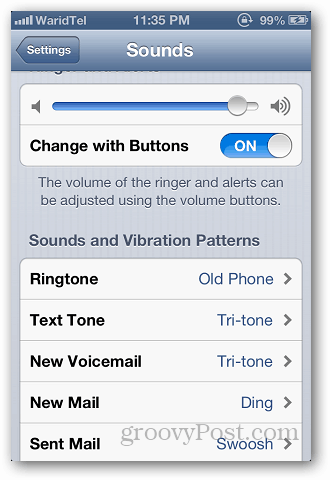
To use your new ringtone, on your iPhone, go to Settings » Sounds.
Under Sound and Vibration Patterns tap on Ringtone.
On top of the list, you’ll see the newly created ringtone. Just select it and you are done.
Do note that you can only create a ringtone from songs that are free of Digital Rights Management (DRM). Just keep that in mind for songs you may have purchased years ago when Apple still had DRM attached to the track. Also with a Mac, you can create a ringtone with GarageBand if you have it. — but we’ll take a look at that in a future article. If you use a different method to make your own custom ringtones, leave a comment and tell us about it! Comment Name * Email *
Δ Save my name and email and send me emails as new comments are made to this post.


![]()
