Switching Between 32-bit Windows 10 to 64-bit
Is My Computer 64-bit Capable?
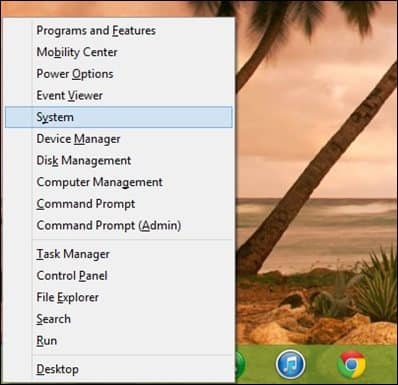
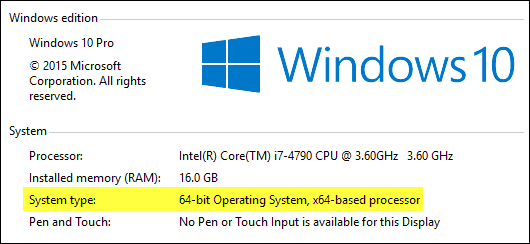
Before you can start migrating to 64-bit, you need to find out if your system is capable. If you’re already running a 32-bit version of Windows 8 or later on your system, you can find out by doing the following: Press Windows key + X to bring up the hidden quick access menu and select System. Look under System > System type, and there it will list whether the processor is x64 based or not. In my case, I have a 64-bit capable processor. Once you have confirmed this, you can move on to the next step.
For Windows 7 and Earlier:
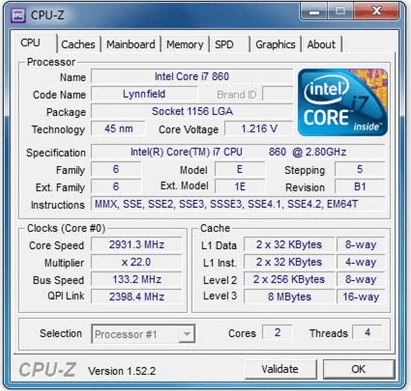
You can determine if your processor is 64-bit capable by using a free tool called CPU-Z. Click the CPU tab and look in the Instructions field. Look for the instruction set called AMD64 or EM64T. If you see them, then your processor is 64 bit capable. If you’re running a 32-bit version of Windows, whether Windows 8 or Windows 7, you will need to consider carefully the steps to migrate from it to 64-bit Windows 8. Regardless of the ubiquity of 64-bit computing, critical factors such as hardware and application compatibility remain an issue, especially for legacy systems.
Please note, some older 64-bit processors might not be capable of running 64-bit Windows 10. To install Windows 10 on your PC, the processor (CPU) must support the following features: Physical Address Extension (PAE), NX, and SSE2. Most CPUs have support for these features, so it is likely because the NX feature is not enabled on your system if you receive this error. Learn more: What are PAE, NX, and SSE2? – Windows Help
Does Your System Meet All Requirements?
Having just a 64-bit capable processor is not the main reason to go with 64-bit Windows. Think about your other hardware, such as your video card, audio device, printer, and any other critical device or application you are using. Also, if you have less than 4 GB of RAM, I strongly suggest you stick with 32-bit Windows 10 or max out the installed RAM before migrating. The first thing to do is to create an inventory of both your hardware and software programs. After doing that, go to the manufacturer’s website and check if there are any 64-bit drivers available. The manufacturer might not have native 64-bit Windows 10 drivers yet, but they might have 64-bit Windows 7 and Vista drivers that might work. The reason why is Windows 8, Windows 7, and Vista all share the same driver model. Application compatibility is an important consideration. For instance, if you are running applications designed for Windows XP or apps that are not fully 32-bit, you might want to reconsider your decision. Older applications that are 32-bit but might contain 16-bit code will not work with 64-bit Windows. So, you need to think this through carefully. If it ain’t broke, don’t try fixing it!
Backup Your Computer
Once you have gathered all the necessary prerequisites, you need to back up your personal data. There is no upgrade path from 32-bit versions of Windows to 64-bit Windows 10. Yes, that means you will have to reinstall all your drivers and applications. Some additional configuration might be required on your part, too. Learn more: How to Create a Windows 10 System Image Backup
Other Considerations
Users who want to switch from 32-bit versions of Windows to Windows 10 64-bit should be aware the migration is a multi-step process. Due to changes in how the compliance check is done for the free upgrade offer for Windows 10, Windows 10-64 bit requires a custom install. But before you can perform that, you need to first upgrade from your current 32-bit version of Windows to Windows 10 32-bit. Ensure you are signed in with a Microsoft account and also ensure Windows 10 is activated. You can do so by going to Settings > Update & security > Activation.
Download Windows 10 64-bit
After having everything in order, you need to download Windows 10 64-bit ISO media and create a bootable copy. Please note you must download the appropriate edition of Windows 10 for the version/edition of Windows you are migrating to. If you upgrade to the wrong edition (i.e., Windows 7 Home Premium to Windows 10 Pro), you will have to purchase a license for Windows 10 Pro or go back to Windows 7 Home Premium and upgrade to Windows 10 Home. See: Windows 10 editions For instructions on getting the Windows 10 ISO, please read our article: How To Download Windows 10 ISO for a Clean Install (Updated)
For UEFI-Based Systems
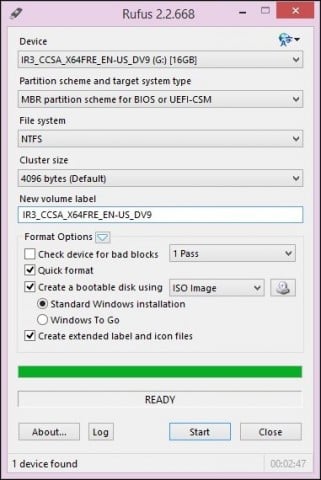
If your computer is UEFI-based, these are usually systems that come pre-loaded with Windows 8 or later; you’ll need to prepare the ISO file for such a configuration, or you will receive an error message during setup. The thumb drive needs to be formatted as FAT32 and use the GPT partitioning scheme. To do this, you need to use Rufus, a small tool you can download for free. Rufus is an awesome free utility that we covered in our article on creating a Windows 10 bootable flash drive. After you have installed Rufus:
Launch itSelect ISO ImagePoint to the Windows 10 ISO fileCheck off Create a bootable disk usingSelect GPT partitioning for EUFI firmware as the Partition schemeChoose FAT32, not NTFS, as the File systemMake sure your USB thumb drive is in the Device list boxClick StartClose when complete
Performing a Custom Installation
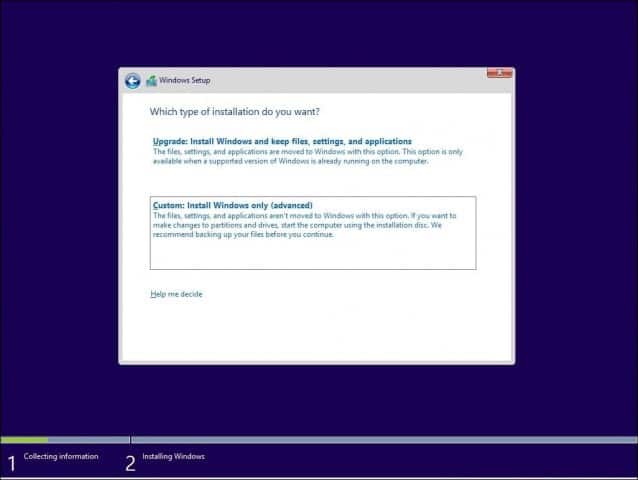
If you attempt to start installing a 64-bit version of Windows from within a 32-bit version of Windows, you will receive an error message. This error message is understandable since you are running a 32-bit version of Windows. To begin the installation, restart the computer and boot from the disc or USB flash drive which contains the installation files. Then follow the onscreen instructions for setting up Windows 10 — i.e., choose your language, keyboard layout, accept the EULA. When you get to the following screen, make sure to select Custom: Install Windows only (advanced).
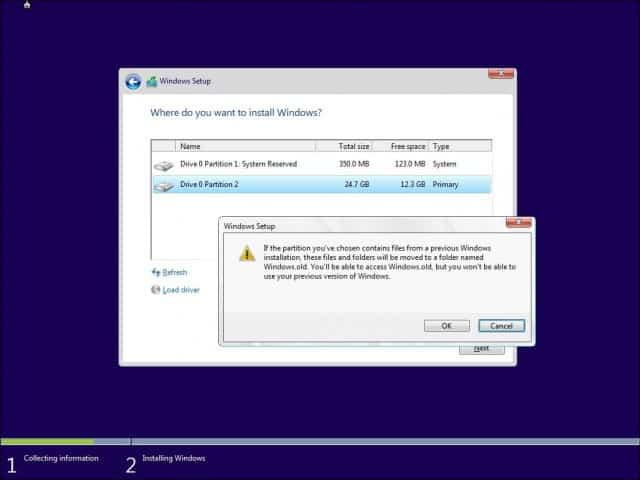
Select the Primary Partition, then click Next. You will receive the following warning message: The partition you selected might contain files from a previous Windows Installation. If it does, these files and folders will be moved to a folder named Windows.old. You will be able to access the information in Windows.old, but you won’t be able to use your previous version of Windows. Click OK and wait while the installation is completed. Your computer will be restarted several times during the process.
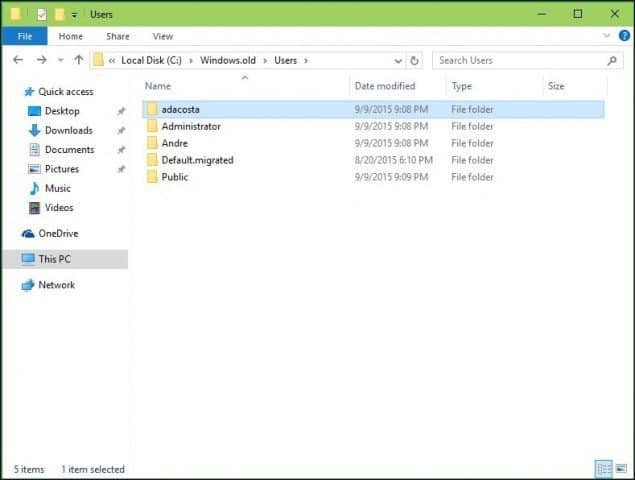
When setup is complete, you can retrieve any personal files from the Windows.old folder, which you’ll find in your local C: drive.
Verify Windows 10 64-bit was successfully installed by going to Settings > System > About.
I also want to know it cause its a important info mate :) Kind regards, Andy please help Your comment is awaiting moderation. and i have only one disk partition called 0 , can i convert it to gpt through the win itself or how to do that ? https://technet.microsoft.com/en-us/library/cc766465(v=ws.10).aspx If the first boot device is your DVD, then as long as it recognized a bootable DVD in the drive, it should try to read it first. If the hard disk is first, it won’t bother even looking at the DVD and just boots from the PC as normal. I made the free upgrade from the validated 32bits Windows 8 Pro edition to 32 bits Windows 10 Pro too Since the beginning and due to the fact, the CPU is a natural 64 bits Intel Core 2 Duo, I pretened to do the corresponding free 64bit upgrade, but – as you clearly stated above – 32 bits Windows 8 Pro did not let me progress; so, the 32 bits Windows 10 was the only available alternative. The upgrade to Windows 10 was perfect in 32 bits. Now, no matter I have to fomat and make a complete clean install again: I want the 64 bits edition Windows 10 installed While stiil running 32 bits Windows 8 Pro edition, I downloaded both 32 & 64 ISO files for Windows 10 installlation. Two DVDs media were burned. When I booted with the 64.bits edition, the installtions stopped because it does not accept the correspondig and validated prodcut key from 32 bits Windows 8 Pro already installed. How can I fix this? I learned I could upgrade from 32bits Windows 8 Pro 32 to 64 bits Windows 10 Pro, but it has impossible to advance. What I am I doing wrong?. Please help to fix this annoying situaition. Thanks in advacne for all you help. Regards. Alexander. Once you have installed the 32 bit version of Window 10 on the computer you are upgrading, you then install the 64 bit version, skip the product key entry and continue the install. Then i got the following message. I did that and then it tells me you loaded from a 64 bit cd please reload from hard disk and then start the upgrade how do i do that Your comment is awaiting moderation. Because I have O.E.M. windows 10 (like a million of them but that matters not) I can pay $99 to upgrade to pro and put it on the P.C. I build instead of buying a “fresh” copy for lke 150% the cost. Right? Comment Name * Email *
Δ Save my name and email and send me emails as new comments are made to this post.


![]()
