In a previous article, we talked about sharing screenshots through screencast.com using Techsmith’s SnagIt. Today I’m going to cover their free screen capturing tool Jing. Jing is built to be very user-friendly, even grandpa could get the hang of it with just a little bit of practice (although he may need help setting it up.) Jing allows you to EASILY capture and share (or not) your screen captures to your favorite friends and websites without any hassle. The program works hand-in-hand with screencast.com which is a friendly and effective online photo storage and sharing site that gives you storage space of 2GB and 2GB of bandwidth for free! Although Jing allows you also to capture video on your screen, today I’m only going to cover its screenshot features. Simple Jing Setup
Download Jing from http://www.jingproject.com/ for Windows or your MAC. The installation is simple; just run the installer.
When you first setup Jing there is a clever Introduction Video. You can watch it if you like or go straight to the bottom-right and Click the Skip button.
To use Jing, you are required to create a Screencast.com account. This account is a real benefit since Screencast is an excellent online service similar to Photobucket or Flickr but without all the strings attached and limits. Note: Normally I would uncheck any “I want to help make this program better” box, but Jing (Techsmith) has a very groovy privacy policy and your information is generally safe regardless of what they are collecting. Not to mention they collect non-specific information.
Once you’ve created your account, you’re ready to use Jing! There are still a few settings that we really should adjust, but we’ll talk about those a little bit later on in the article. Using Jing To Capture Screenshots and Share Them Easily
The first thing to appear on your screen once installation finishes is the small Sun which docks on the edge of your desktop. If you hover over it, you’ll see a few options appear. If you find the dockable sun annoying, all of its buttons can be accessed just as easily from the system tray. If you’re itching to take a screenshot, however, the left button of the sun can be used to do so.
There are several ways to take a screenshot, the sun button as mentioned above, using a hotkey, or initiating a screen capture from the system tray icon. Once you hit the screenshot button, directly Draw a Box around what you would like to save. A small info bar will follow your mouse around and give you the exact dimensions (in pixels) of your capture.
Once you let go of the mouse Jing will capture your selection. You go into a pre-save screen where you can redo your selection or change it to a video. For this example, we’ll continue and Click Capture image.
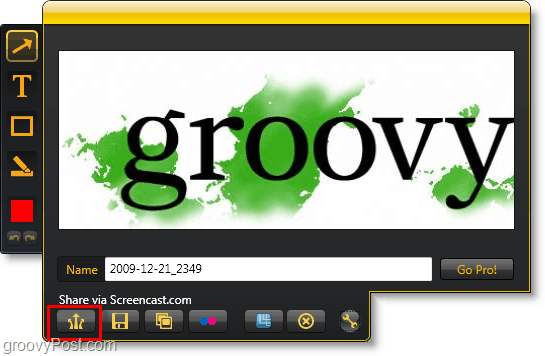
You’ll arrive at the Jing editing window. It is fairly basic with only a few editing tools, but what is nice is the sharing features. If you Click Share via Screencast.com if will automatically be uploaded and the URL automatically copied to your clipboard so all you have to do is Paste the Image URL wherever you would like to share it. Additional settings apply to Share to Youtube, Twitter, Flickr, and even FTP. Read on to look at changing the settings to make Jing easier to use. Screencast uploaded image example
Change Jing Default Settings For Easier Use
To access the Jing settings window, Right-Click the Jing icon from your system tray. Click More.
Jing keeps things simple as there is only one settings page. The first thing I recommend is to Set a Capture hotkey. Print Screen is an obvious choice since it’s the default window’s screen capture button. If you set a hotkey, you can disable the docked Sun on your screen. Next, if you want to set up Jing for sharing to more than just screencast.com then Click Customize under Sharing buttons.
Click the New box to set up a new button.
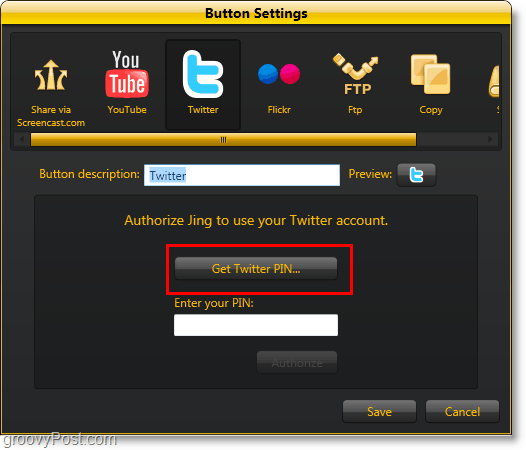
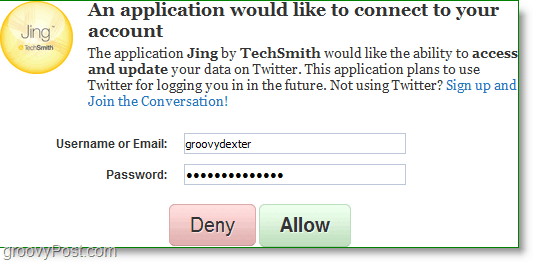
To create a Jing button to share with any service just click the service tab and enter your information. For Twitter, Click the Twitter tab and then Click the Get Twitter PIN button.
You’ll go to the Twitter application authorization page in your internet browser. Enter your Twitter account information and then Click Allow. You’ll then go to a page with a number displayed in the middle, Copy that number and then Paste it under Enter your PIN:.
Now when you take a screen capture, you can share it directly to Twitter, and even type in a tweet message to go along with it. The process is equally as simple for Flickr and YouTube. Very groovy!
Jing’s ease of use and price (free) makes it one of my favorite tools. This choice should come as no surprise being that Jing comes from Techsmith, the creators of Snagit and Camtasia Studio – the standards for screenshot captures and Video screencasts and two of my favorite tools! Looking at all the screenshots on groovyPost.com, I’m sure you can understand why! Comment Name * Email *
Δ Save my name and email and send me emails as new comments are made to this post.


![]()
